Suggested Ages: 6+
This DIY challenge hits the mark for hands-on fun. Inspired by the way real bows and arrows work but made using simple techniques, this super-strong, carefully tested craft stick and straw set is the perfect project for aspiring archers and innovators—like you!
This is no ordinary DIY for kids project: It’s a step toward becoming an innovator
Every Galileo Design-It-Yourself challenge teaches the same techniques that professional designers, engineers and artists use in their work. With skills like these, we believe you can change the world.
All innovators need these→ keep an eye out!
- KNOWLEDGE: Facts, skills or context to inform your project
- MINDSET: The right frame of mind to innovate
- PROCESS: Steps to guide you along the path to your goal
The Design-It-Yourself Challenge
- Build a bow that’s strong and doesn’t crack or break.
- Build at least three different arrows and find the one that works best.
What You Need
- 20 or more 6″ or 8″ jumbo craft sticks
- Masking tape
- 2 notched skill sticks*
- Cotton string
- Various non-bendy plastic straws
- 1 or more 4″ mini hot glue sticks
- Scissors
* You can use regular 4 1/2″ craft sticks if you don’t have notched sticks, but your bowstring may slip. To keep it in place without notches, wrap the string tightly and use small pieces of tape.

How to Build Your Bow and Arrow Set

Step 1
Start your bow by generously overlapping two jumbo craft sticks and tightly wrapping the overlapped area with masking tape in at least two places.
Knowledge Alert
A key building technique for this project—and lots of others—is called overlap and wrap, which works just the way it sounds: First overlap two pieces of building material, then bind them together to make your bow (or anything else you’re making) extra strong.
Step 2:
Make your bow longer by adding more craft sticks using the overlap and wrap technique. The more you overlap, the stronger your bow will be.
A longer bow can be more powerful, but it’s also harder to make strong. A bow that’s about 2 1/2 or 3 sticks long is a good length to start with.

Step 3:
Make your bow stronger! Continue overlapping and wrapping sticks on top of your bow—a thick bow is a strong bow. Make sure the ends of the bow are at least two sticks thick.

Step 4:
Insert a notched skill stick in the gap between craft sticks at one end of your bow. Break it so that just 1″ sticks out. Repeat at the other end.
Step 5:
Attach a bowstring to one end. Cut a piece of string about twice as long as your bow. Tightly wrap the string around the end of one of your notched skill sticks many times. The friction from the wrapping should keep the string in place, but if it starts to unravel, apply a small piece of tape.

Step 6:
Test the strength of your bow. Slowly and carefully bend the bow. If you hear a cracking noise, stop right away! Fix the weak area by overlapping and wrapping at least three more craft sticks over the break.

Step 7:
Fasten the other end of the bowstring. (Ask a buddy for help with this part.) Once your bow is strong enough, wrap the end of the bowstring around the skill stick on the other side while your buddy holds the bow in a bent shape. Put a little piece of tape over the string if it starts to unravel (don’t tie a knot, as you’ll need to release this end later).
Step 8:
Evaluate your bow again, looking for weak spots. Here you can see one area that looks thick, but is actually only supported by two stick layers:

Step 9:
Redesign. We added another stick to cover the weak area. Does your bow need more tinkering? Check out your design and ask yourself some questions: Where do you notice your bow is bending? How might you make that part even stronger?
Step 10:
Give your bow a break. Once you’re satisfied with the strength of your bow, undo the string on one end while you make your arrows. If you keep the bow under tension for too long, it might lose its strength, or even break.
Step 11:
Start making arrows by cutting a small piece of glue stick with your scissors and taping it to the tip of a plastic straw.
Knowledge Alert
Have you ever tried throwing a plastic straw? It doesn’t go very far. That’s because a straw isn’t very heavy, so the air drags on it and slows it down. That’s why we need to add a little weight, or mass, to our straw arrow. When mass is moving, it has momentum, which is a force that helps it keep going in the direction you’ve thrown it. In this project, the weight of the glue stick helps the plastic-straw arrow push through the air without getting slowed down.
Step 12:
Create the nock, the little notch at the end of an arrow that helps it stay on the bowstring. Start by wrapping tape around the non-glue-stick end of the straw. Pinch it, and use your scissors to cut off the corners.


Step 13:
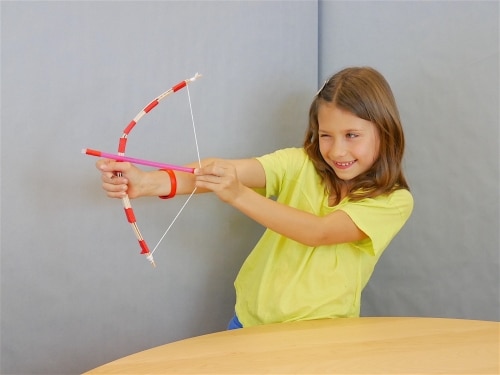
Get ready to fire! Fit the nock of your arrow onto the bowstring. Make sure the arrow is in the middle of the bowstring with the front (the glue stick side) pointing straight forward.
Use your non-dominant hand to grip the bow, and your dominant hand (if you’re right-handed, that’s your right, if you’re left-handed, your left) to pinch the arrow. Pull back and fire by simply letting go of the arrow! No need to push the bow forward.


Step 14:
Redesign (and redesign again!). Remember, your arrow is just as important as your bow when it comes to making your archery set successful. If your first design isn’t flying quite as fast or far as you like, try creating more arrows in different sizes, shapes and weights.
As you craft new arrows, ask yourself some questions: How might you make your next arrow totally different from your last one? How might you change its length or weight? What’s the craziest arrow design you can think of? Be courageous and try it!

Process Protip
Take the time to test and evaluate each new arrow you create. Test each arrow three times, making sure you’re firing with the same amount of power and pointing the bow at the same angle as you assess it. If your heaviest arrow works best, try making one that’s even heavier. If your shortest or longest arrow flies the farthest, try making the next one even shorter or longer. In no time, you’ll redesign your way to an arrow that really soars!
Mindset Challenge
When you find an arrow that works well, be reflective by asking yourself, “What’s different about this arrow that makes it better?” By looking closely at each successful arrow and making a thoughtful guess about why it’s good, you can make even better ones in the future.
Innovate On!
- Once you design an arrow you really like, make copies of your best design so you have a whole set on hand.
- Create a quiver (an arrow bag) to carry your arrows by transforming a paper towel tube. Flatten one end of the tube by creasing it at opposite sides and sealing the bottom with tape. Add a carry strap or belt and decorate your quiver with colored tape, paper or markers.
- Make a target! The sport of archery involves releasing arrows aimed at a target. Archery targets are often created using bright, concentric circles, with the most points awarded for hitting the smallest circle in the center (the bullseye), but you can design a target in any way you like. Find a safe wall away from any windows or valuables, hang your target and stand 15 feet away to practice. Redesign your equipment as needed to improve your game.
Hungry for more? Check out other Galileo DIY for kids projects.