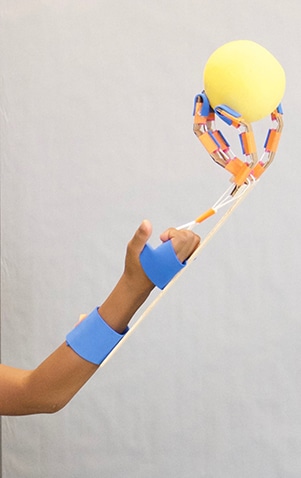
 Looking for a real DIY challenge? Try your hand at this altogether awesome project: a fully functional mechanical hand! Using some simple materials, you can engineer your own handy appendage, complete with straps to make it wearable and articulated fingers that can bend, grasp and pick things up.
This is no ordinary DIY for kids project: It’s a step toward becoming an innovator
Every Galileo Design-It-Yourself challenge teaches the same techniques that professional designers, engineers and artists use in their work. With skills like these, we believe you can change the world.
All innovators need these→ keep an eye out!
???? KNOWLEDGE: Facts, skills or context to inform your project
???? MINDSET: The right frame of mind to innovate
???? PROCESS: Steps to guide you along the path to your goal
THE DESIGN-IT-YOURSELF CHALLENGE
Build a mechanical hand that…
Has at least three fingers.
Articulates smoothly.
Can pick up everyday objects.
SUGGESTED AGES*
Oldest: Anyone!
Youngest: 10
*You’ll need a buddy for this challenge
WHAT YOU NEED
- 1 synthetic cork*
- Utility knife
- Corrugated cardboard (the kind you find on a box)
- Large scissors
- 2 plastic straws
- Masking tape
- String
- 1 paint stirrer
- 1 6″ jumbo craft stick
- Hot glue gun and glue stick
- A few everyday objects (like a sponge and a paper cup)
- Craft foam
*Need help finding a cork? Ask nicely at a restaurant or substitute square wooden beads, 1/2″ sections of square dowels or other similarly shaped materials.
[photo: materials]
HOW TO GET READY
1. Cut your cork into quarters using your utility knife (see photo). You’ll want to ask an adult for help with this part.
[photo: cut cork]
2. Brush up on the anatomy of the hand so you’re ready to make your own mechanical version.
???? KNOWLEDGE ALERT
Did you know your fingers don’t have muscles in them? The muscles that control your fingers are actually in your forearms! Those muscles are connected to your fingers by tendons—think of them as cables. The tendons are held in place by ligaments—think of them as connectors. Annular ligaments (annular means “ring”) are shaped like rings. Tendons slide through the rings, which keep them lined up where they should be. In this project, we’ll use strings for tendons and pieces of plastic straws as annular ligaments.
[photo: finger anatomy]
HOW TO BUILD YOUR MECHANICAL HAND
Step 1. Make some decisions about your fingers. You’ll want at least three, in any size you like. Longer fingers can grab larger objects, but may require more joints to work well. Shorter fingers will be more durable, but won’t be able to grab large items. We decided on four fingers, each about 3/4″W x 6″L.
[photo: building 3]
Step 2. Make your fingers from strips of cardboard.
After deciding on their size, bend your cardboard to those measurements. Bending the cardboard before cutting will help avoid accidental creases, which will weaken it.
Make sure that the cardboard’s corrugations are going lengthwise along the finger (i.e., from the fingernail area to the hand), rather than across the finger, to increase its strength.
Use large scissors to cut your strips.
[photo: building 1] [photo: building 2]
Step 3. Create joints in your fingers by using closed scissor blades to make creases across your cardboard strips. (Use the scissors to make dents or folds, not cuts.) Each crease will make the cardboard bend like a joint. We made two joints per finger, spaced 2″ apart, but you can make more if you want.
[photo: building 4 (x2)]
Step 4. Make ligaments by cutting pieces of straw shorter than the spaces between your joints. Tightly wrap them onto your first finger with masking tape. Be sure to leave a good-sized gap between the pieces of straw so the ends don’t bump into each other when they bend.
[photo: building 5]
Step 5. String your tendons. Cut a 12″ piece of string. Thread it through all the straw ligaments on one of your fingers, then tape the end to the back side of the finger. The edge that the string loops over will be the fingertip. (If you run into trouble getting the string through your straws, try using a pipe cleaner or other thin object to push it through.)
Step 6. Evaluate your first finger. Take a moment to see how its new ligaments and tendons work by pulling the string. Does it articulate smoothly? Does it curl all the way? If not, redesign until it’s working well before you move on. Here are some tips for redesigning:
- Are the straws taped down firmly or are they moving when you pull the string?
- Is the string catching on the tape (tape should not be as wide as the straw segments) or anything else?
- Are the straw segments bumping into each other?
- Are the creases in the cardboard parallel to each other and spaced well?
- Is the string taped securely on the fingertip end?
[photo: building 7 (x2)]
Step 7. Attach ligaments and tendons to your remaining fingers, testing and evaluating each one, and redesigning if necessary. (It’s much easier to fix a finger before it’s attached to the hand.)
[photo: building 8]
Step 8. Make the palm of the hand by centering and hot gluing the 6″ craft stick crosswise onto the end of the paint stirrer, creating a T-shape.
[photo: building 9]
Step 9. Choose an arrangement for your fingers and set them in place on your palm, ligament-side up. We tried ours with two outer fingers facing forward, and two inner fingers facing backwards so they can curl in toward each other. They’re also arranged to interlock, so they won’t bump into each other, but you could try positioning yours so the tips pinch together.
???? KNOWLEDGE ALERT
- Pinching – Fingers meet end to end. This is helpful for picking up small objects but not as helpful for grasping some larger objects
- Clasping – Fingers crossing over each other. Clasping is used for grasping a wider range of objects but not for picking up small objects.
[photo: building 11]
Step 10. Attach the fingers temporarily. Apply a pea-sized dot of glue on the back of each finger, at the end opposite the fingertip. (Using small amounts of glue is important so you can redesign your finger arrangement later.)
[photo: building 10]
Step 11. Test your mechanical hand by trying to pick up objects of different sizes and weights or by trying to complete specific tasks (catching a foam ball, holding a marker, picking up a cup, etc.) You’ll notice that your hand is better suited to some tasks than others.
[photo: building 12]
???? PROCESS PROTIP
Carefully testing your hand’s functionality, evaluating what works well and what doesn’t and redesigning accordingly is essential to arriving at the best design possible. Because there are a lot of variables in this project, troubleshooting can be complex and require multiple rounds of redesign.
Step 12. Try another design. Remove the fingers (which should just be attached with small dots of glue) without damaging them by gripping the glued spot and twisting it sideways. Then try something else—perhaps a new finger arrangement, a different number of fingers or even a reimagined design of the fingers themselves.
[photo: building 12-13]
Step 13. Test your new design. Here we glued two pieces of cut cork onto the middle of the palm, then glued the two middle fingers onto the flat sides of the corks.
Now, when the hand closes, it can grasp smaller things. This works well for the fingers we made, but you’ll need to experiment to find an arrangement that works best for your design.
Questions to consider if you aren’t getting results:
- Is there a finger that isn’t moving as much as/as well as the others? Why?
- What exactly is preventing your hand from doing a specific task? How could you fix that?
- How else might you position the fingers?
- How could you make the grasp of your hand stronger?
[photo: building 14] [photo: building 16]
???? MINDSET CHALLENGE
Even if your design is mostly working, be determined and keep fine-tuning until your mechanical hand can do the tasks that are important to you.
Creating a hand that works like a human one is a big challenge, even for professional scientists and engineers. Sometimes, thinking about the real-life purpose of your project can provide the inspiration you need to persevere.
Step 14. Attach the fingers permanently. Once you’re satisfied with your fingers and their placement, carefully remove each one to break the weak glue bond, then apply a generous glob of hot glue and reattach the fingers exactly where you’ve decided they should go. You can also glue around the perimeter of the bottom cardboard joint where it attaches to the palm.
[photo: building 15]
Step 15. Enhance your grip. While you were testing, you may have noticed that no amount of redesign could make your hand pick up something slippery or smooth, like a cardboard cup. That’s where grip comes in!
Cut out small pieces of foam, then glue them onto the fingers. These foam bits create more friction than the tape, which will help your hand grip smoother objects. Make sure you don’t put the foam pieces too close to the joints or they could interfere with the finger movement.
As you work, ask yourself: Where do the fingers come into contact with objects? That’s where you should place your foam! You can also layer foam to make the finger tips thicker if that helps with the grip!
[photo: building 17] [photo: building 18 (x2)]
Step 16. Finalize your hand. Once your fingers are finalized, carefully trim off any excess craft stick that’s protruding from the sides of your hand.
[photo: building 19]
HOW TO MAKE IT WEARABLE*
*Here’s where you’ll need that buddy
Step 1. Make a palm strap. Lay your mechanical hand on the table, and position the back of your own hand against the paint stirrer so the tip of your middle finger is about 1″ from the “palm” (where the paint stirrer intersects with the craft stick).
Have your buddy slip a 10″ × 2″ piece of foam under your hand, just below your fingers.
Take your hand away and glue the foam piece into place.
[photo: wearable hand 1]
Step 2. Fasten your strap. After the glue cools, place your hand on top again. Wrap the foam over your palm, and have your buddy tape the ends together. The strap should be snug around your palm. You may need to trim some of the foam if it’s too big for your hand.
[photo: wearable hand 2]
Step 3. Make an arm strap. Pull your hand out of the strap and glue another foam strip onto the back of the paint stirrer, close to the bottom.
Put your hand back into the palm strap, then have your buddy wrap the second strap around your forearm, and tape it. The forearm strap should be taped more like a buckle-type closure so you can move your arm in and out by pulling back one side of the tape.
To remove the hand, just untape the forearm strap. Leave the palm strap taped in a loop so you can slip your fingers through it.
[photo: wearable hand 3]
Step 4. Create a pull. With your hand inside the palm strap, have your buddy wrap all of the finger strings around your middle three fingers.
[photo: wearable hand 4]
Step 5. Test your pull. Curl your fingers slightly so the strings don’t slide off. Have your buddy tug on the strings until they’re taut, and then wrap a piece of tape around all of the strings, making a loop for your fingers. Pinch and press the tape several times to make sure the strings are stuck to it.
Give it a try! When you flex your middle three fingers, your mechanical hand should close!
[photo: wearable hand 5]
???? MINDSET CHALLENGE
It’s important to get the string length just right around your fingers so the mechanical hand is easy to use. Be determined and test your ability to do all the tasks that are important to you. You may have to undo and retape the looped string several times until you get it just right.
Step 6. Wrap up. When you’re satisfied with the position of your strings, double-back the ends and wrap them with tape again. This will prevent them from loosening. Trim the ends.
[photo: wearable hand 7 (x2)]
Step 7. Try your hand at everyday tasks. What can you do with your prosthetic hand? Drink water from a paper cup? Pick up a piece of fruit? Open a door? Open the lid of a container? Catch a foam ball or a balled-up sock? Push a button on a computer or TV remote?
Notice which tasks are easy, which are hard, and which are just impossible. The human hand is incredibly complex and adaptable. Hopefully this exercise gave you a deeper appreciation of the amazing work your two hands do every day!
INNOVATE ON!
- What can you add to help open up your mechanical hand’s grip? (Springy plastic? Small rubber bands?)
- How can you modify your hand for a specialized task, like holding a pencil or pushing buttons on a microwave?
- How would your design change if you were making a hand for a toddler? For a pianist? For someone who loves to play cards?
Hungry for more? Check out other Galileo DIY for kids challenges.
Galileo Learning ignites the innovator in every kid through summer camps in the California Bay Area, Southern California and Chicago.


